
NEX 3D Sweep Panorama StereoPhotoMaker Tutorial
If you don't have a 3D TV yet, here's a way to view your Sony NEX 3D pictures.

This is our first time with StereoPhotoMaker, if you have any tips or tricks with the software please let us know.
There are more tutorials at the StereoPhotoMaker website. Thank you Masuji SUTO.
Or you can skip steps 1 to 10 by buying a 3D Bravia TV.

Email us your Sony NEX 3D photos!

Sony NEX 3D Sweep Panorama to Wobble 3D via StereoPhotoMaker
- Download the latest version of StereoPhotoMaker by Masuji SUTO.
- Extract the file into a directory.
- Copy an MPO (multi-picture object) file created with 3D Panorama Sweep from the Sony NEX camera with ver. 02 firmware into the directory in step #2.
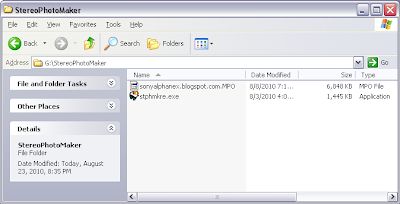
- Drag and drop the MPO file onto stphmkre.exe.
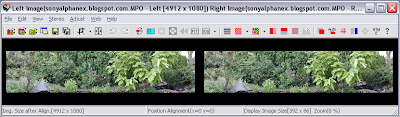
- StereoPhotoMaker will open up with the Left and Right image of your NEX 3D MPO file.
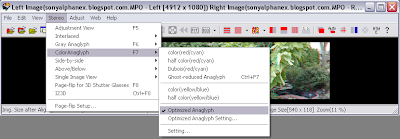
- To view with Red-Blue 3D glasses, click on Stereo > ColorAnaglyph > Optimized Anaglyph.
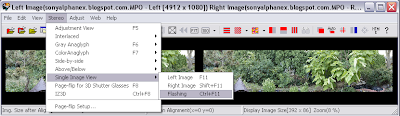
- To view as a wobble 3D image, click on Stereo > Single Image View > Flashing. Adjust the speed to your preference.
- You can resize the final output by clicking Edit > Resize. Enter your preference and make sure to Keep the Aspect Ratio.

- To save the anaglyph of the NEX 3D MPO file, perform step #6, then click on File > Save Stereo Image. The save dialog will pop up, press save.
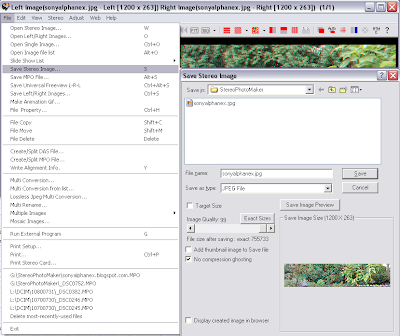
- To save the animated gif of the NEX 3D MPO file, click on File > Make Animation Gif. The save dialog will pop up, press save.


This is our first time with StereoPhotoMaker, if you have any tips or tricks with the software please let us know.
There are more tutorials at the StereoPhotoMaker website. Thank you Masuji SUTO.
Or you can skip steps 1 to 10 by buying a 3D Bravia TV.
Email us your Sony NEX 3D photos!
Thanks for this tutorial!
ReplyDeleteVery straightforward
One big problem of the NEX-5 HDR
ReplyDeleteThe AUTO-HDR works from +/- 1 EV to +/- 6 EV in the NEX-5
but the exposure bracketing for Photomatix Pro, Artizen HDR o Photoshop works
only from +/- 0,3 EV to +/- 0,7 EV.
Anyone can understand the reasons of that deficit (very easily solvable with a
new firmware) in the best Sony 3D camera?
Best regards.
Josep
--- In photo-3d@yahoogroups.com, "elendito" wrote:
>
> The problem with the computeral HDR in the Nex-5
> is its poor exposure bracketing: only +0,7 , 0 , -0,7
> (or +0,3 0 -0,3.
>
>
> That can have easy solution with a new future firmware.
>
>
>
> All the best.
>
>
> Josep
>
>
> PS
>
>
> (dpreview):
>
> "One big problem of the NEX is if you want to use the auto bracket feature, it
is limitated to �0.7EV with 3 shots. To get a good result with photomatix you
will need at least �2.0EV shots. To achieve that result with the NEX you'll
need to change the settings between each shot, so it won't be possible to do it
handheld".
>
> (outbackphoto):
>
> "The images clearly need some post processing. Not sure this is really a con
for us because it is hard to believe that the camera could do a perfect job. As
the result the camera produces very soft and de-saturated images.
>
> Only 3 shots in bracketing and the bracketing only allows +/- 2/3 EV exposure
steps. This seems strangle because the in-camera merge allows more EV spacing.
>
> The easy solution, from Sony for us, is to increase the exposure steps of the
bracketing for acheve the best HDR results.
>
> In the ideal world we would like to be able to get all exposures as RAW files
and the merged image as well. If this would be too hard to implement then Sony
should at least allow to get the middle exposure as a RAW file because we are
not really happy with the NEX JPEG quality (shadows are way too much crushed for
our taste)".
@omnial Unfortunately it seems Sony likes that max of +/- 0.7 EV for it's auto-bracketing. Even the SLT-A55 uses it. The best way is to do it is in Manual mode so that you have maximum shots and an EV range to your liking.
ReplyDeleteBut that is a big deficit in front of
ReplyDeleteCanon EOS 550D, Lumix G2H and others cams
in order to make HDR pics with Photomatix
or Photoshop, without tripoidal and manual mode.
I think that can have a easy solution with a new future firmware for our NEX-5... I hope...
I certainly enjoyed the way you explore your experience and knowledge of the subject! Keep up on it. Thanks for sharing the info
ReplyDeleteGreat tutorial, exactly what I was looking for!
ReplyDeleteTHANKS SO MUCH, GOD BLESS YOU
ReplyDeleteI wanted to thank you for this excellent information!! I undoubtedly enjoyed every bit of it and I have bookmarked hat's good for all. You are lovely.
ReplyDeleteWonderful post, really great tips and advice. I
ReplyDeleteGood job ! Thank you for share !
ReplyDelete